Tuesday, October 29, 2024

Network location awareness service - enhancements

I've seen several issues related to this service and other services that depend on it in domain environments. From support cases and our own troubleshooting, there are some changes you can make to help make it more reliable as well as improve the reliability of BITS. 

 1)  HKLM\System\CurrentControlSet\Services\NlaSvc\Parameters.  Create dword AlwaysExpectDomainController = 0x1
2)  HKLM\System\CurrentControlSet\Services\DnsCache\Parameters.  Create dword MaxNegativeCacheTTL = 0x0
3)  HKLM\System\CurrentControlSet\Services\Netlogon\Parameters.  Create dword NegativeCachePeriod = 0x0
4) HKLM\System\CurrentControlSet\Services\NlaSvc.  Edit DependOnService reg_multi_sz to ensure that NSI, RPCSs, TcpIp, Dhcp, Eventlog, and Netlogon are in the list.  If you are running a domain controller that is also a DNS server, I would recommend adding Dns to this list.
5)  HKLM\System\CurrentControlSet\Services\bits.  Edit DependOnService reg_multi_sz to add nlasvc to the list.

These keys will help ensure the machine retries network detection failures and does it in an efficient way by turning off negative result caching.  The dependency addition helps ensure the right services are started first to get a domain network detection (especially the netlogon service).  I've noticed that BITS doesn't seem to recheck the network connection profile information that NLAsvc provides, so it can cause problems if bits starts before nlasvc.  Setting that additional dependency will help ensure bits does start throwing TransientError, "There are currently no active network connections" messages on bits jobs.

Wednesday, March 20, 2024

New-ADComputer : A required attribute is missing

When trying to create a computer with this commandlet and you get this error, it may be a poorly worded exception. This error can come up if you don't have permissions to create computer objects on the OU you provided. If you follow the commandlet examples and provide what is required: samaccountname, name, and path; go check the OU permissions. If you had tried doing it with the older dsadd command, it will give an error that the modification was not permitted for security reasons. Once permissions are fixed, or a different set of properly delegated credentials are passed, it should work fine.

Another permissions related gotcha is when performing the task under run as different user, I have notice the same failure when the user performing the action has sufficient rights via group membership on the target OU.  When directly adding that user to the OU permissions, it allowed the creation of the computer object.  Possibly some run-as activity isn't passing a full access token on the connections and the group membership is ignored?

Sunday, August 20, 2023

Splitting AD integrated reverse DNS zones

If you have an environment with a reverse dns zone that was created with broad network range, you may decided at a later point in time that you want to split the zone. The reasons for this might be: ease of management in terms of loading the zone in the dns management console, easier to find records, requring differences in record age and scavenging control, etc. For a zone that is AD integrated, it will be in one of 3 partitions (domain partion, domaindns partition, or forestdns partition). You can adjust the code to the appropriate distinguishedname of the zone. Distinguishednames can be retrieved using get-dnsserverzone and reading the distinguishedname property on the returned object.

When it comes to splitting the zone, there's a few things to remember with AD integrated DNS. All records are objects under a zone object. Making changes in the dns management console doesn't mean objects in AD will automatically be deleted or migrated for you. You can end up in situations where hidden old records still exist in ldap, but don't show up in the dns management console. This code example below will help guide you in extracting the records you want and putting them in a new ldap dns zone object, along with preserving the data, timestamps, and permissions on the objects.

This example below is splitting of all 10.1.x.x records from a 10.x.x.x reverse zone. Before running your modified code, create your new reverse dns zone, then stop the dns server on the domain controller that you are making this change on.


get-adobject -searchbase "DC=10.in-addr.arpa,CN=MicrosoftDNS,DC=DomainDnsZones,DC=Contoso,DC=Com" -ldapfilter "(objectclass=dnsnode)" | 
    where {$_.name -match "\.1$"} | 
    move-adobject -targetpath "DC=1.10.in-addr.arpa,CN=MicrosoftDNS,DC=DomainDnsZones,DC=Contoso,DC=Com"
 

get-adobject -searchbase "DC=1.10.in-addr.arpa,CN=MicrosoftDNS,DC=DomainDnsZones,DC=Contoso,DC=Com" -ldapfilter "(objectclass=dnsnode)" | 
  where {$_.name -match "\.1$"} | %{

               $newname = $_.name.replace(".1","")
               $_ | rename-adobject -newname $newname
              
  }
Once this completes, start the dns server service to force rereading of ldap information. Dns zone reload is not sufficient. Other domain controllers should not require restart of dns service as they pick up the changes as it replicates. Test this in a lab environment first and run at your own risk.

Tuesday, April 25, 2023

Defender for Identity agent problems

I've run in to a few issues with Azure Advanced Threat Protection Sensor services not starting (aka Defender for Identity). Here are a few tips to work through various issues.

Problem #1, service failing to start due to files not found. The updater service will auto update the agent version. If you look at the program's directory "C:\program files\Azure Advanced Threat Protection Sensor", you will one or more subfolders named with version ID's for the agent. Occasionally the updater fails in some way causing the windows service's registry information to point to a folder version that no longer exists. In these cases, just update the ImagePath registry entry in HKLM\System\CurrentControlSet\Services\AATPSensor and \AATPSensorUpdater to point to the highest version # folder that you have in the program's directory. This should allow the service to start, assuming there is no problem with the contents of that folder. If there is, you can try a different version # if there are others present.

Problem #2, "Error PerformanceCounterLib System.InvalidOperationException: Category does not exist" is showing up in the Microsoft.Tri.sensor.Updater.log file. This is an issue with windows performance counters. You may also see an error showing up if you open the Perfmon tool, and it complains about missing counters there as well. You can try these commands in an administrator cmd prompt to remediate this:

cd c:\windows\system32
lodctr.exe /R
cd c:\windows\syswow64
lodctr.exe /R
lodctr.exe /E:perfdisk
lodctr.exe /E:perfnet
lodctr.exe /E:perfOS
lodctr.exe /E:Tcpip

Start the updater service again to see if it starts.

Problem #3, service won't start, no clear reason why. When uninstalling and reinstalling the software, the program files directory for the application doesn't get created, but the software shows up in add/remove programs. You will not be able to install or uninstall at this point because both processes will complain about the software not being there, or already being installed. To work around this, copy the files from another machine. Manually create the service names using sc.exe. Once that is in place, do the uninstall again. This should trick the installer enough to uninstall the application. You can then try the install process again.

Windows Firewall - network card not detecting the correct connection profile

For people familiar with Windows firewall, there are 3 profiles that you can create rules for: Private, Public, and Domain. The operating system uses the Network Location Awareness service (NLAsvc) to attempt to identify what type of connection each NIC is on. If you machine is domain joined to an Active directory on-prem domain, it will make connection attempts to domain controllers to see if a specific NIC can reach one. For other tests, it will try to connect to websites to see if there internet connectivity. The problem with windows firewall and its domain checks is that you might not have a well enough functioning network connection when the NLAsvc tries to perform its checks. On a domain controller, this is particularly problematic. To work around this you cand modify the service settings in the registry to add some additional service dependencies. This will delay the start up of the NLAsvc process and give the system more time to be ready for the checks. To do this, open regedit and navigate to HKEY_LOCAL_MACHINE\System\CurrentControlSet\Services\NlaSvc. Edit the "DependOnService" REG_MULTI_SZ value. For new entries, you will add one entry per line. The values you will want to add are: NSI, RpcSs, TcpIp, Dhcp, Eventlog, DNS, Netlogon.

There are some additional configurations you will want to push as well:
HKEY_LOCAL_MACHINE\System\CurrentControlSet\Services\NlaSvc\Parameters\AlwaysExpectDomainController (REG_DWORD) = 0x1
HKEY_LOCAL_MACHINE\System\CurrentControlSet\Services\Dnscache\Parameters\MaxNegativeCacheTTL (REG_DWORD) = 0x0
HKEY_LOCAL_MACHINE\System\CurrentControlSet\Services\Netlogon\Parameters\NegativeCachePeriod (REG_DWORD) = 0x0

These will add some additional stability for NLA.

Thursday, June 23, 2022

PetitPotam Defenses

Protection against coerced authentication on domain controllers:


Print Spooler:


Disable the service via group policy on all DC's

EFS RPC attack:


Create the two RPC filters by putting this in a text file (source):

rpc
filter
add rule layer=um actiontype=block
add condition field=if_uuid matchtype=equal data=c681d488-d850-11d0-8c52-00c04fd90f7e
add filter
add rule layer=um actiontype=block
add condition field=if_uuid matchtype=equal data=df1941c5-fe89-4e79-bf10-463657acf44d
add filter
quit


Save the file and use "netsh -f filename.txt" to apply it


DFS RPC attack:


Create one RPC filter by putting this in a text file (source)

rpc
filter
add rule layer=um actiontype=block
add condition field=if_uuid matchtype=equal data=4fc742e0-4a10-11cf-8273-00aa004ae673
add filter
quit


Save the file and use "netsh -f filename.txt" to apply it

This dfs filter has some impact on creation of new dfs namespaces. Otherwise it doesn't seem to cause other issues that I can tell.


Certificate Authority hardening:


Follow the MS guidance on hardening the CA against NTLM relay. Essentially you configure the web interfaces to allow kerberos only with extended protection. If possible, disable NTLM auth completely on the server. Beyond that, limiting access to client certificates and not allowing user supplied SAN's on them should be done.

Thursday, February 17, 2022

Creating virtual smart card for MIM CM

To use a virtual card on existing profiles that prompt for pin in the certificate manager portal site, use this to create the virtual card:

tpmvscmgr create /name myvsc /pin prompt /adminkey default /generate

When prompted for default admin key, use: 010203040506070801020304050607080102030405060708

When prompted for pin, it will need to be 8 characters long even if it says it can be less than that.

Wednesday, December 29, 2021

Finding expiring certificates in your CA

A while ago, I was working on a method of discovering and creating alerts for expiring smartcards.  While looking at some of the various methods to pull details from FIM certificate manager or the AD certificate services CA that issues the certs, I ended up goinig with certutil as the tool of choice for pulling the data.  The build in filtering of the results helped give the ability to confine the results to certain certificate types, and also to avoid anything that was revoked.  Putting this together with output processing in powershell, it is pretty easy to pull together a list of certs and their expiration time.  Using grouping, you can avoid the problem of having multiple results per user (for those who have already renewed).  Since smartcards use UPN as an identifier, I went with that attribute to help get the user details.  For other use cases that would need to be modifed and the Get-ADUser functionality wouldn't be required.


#this line needs to be modified to target the CA and the OID
#of the cert type that you want to look at (if you are restricting it
#Disposition of 20 means certs that are active
certutil -config "<CA server FQDN>\<CA NAME>" -view -out "user principal name,certificate expiration date" -restrict "certificatetemplate=<templateOID>,Disposition=20"  > .\certdump.txt

$results = @()
$recordbound = $false
Try { $data = get-content .\testcertdump.txt -erroraction stop } catch { 
		#error handling
	}
For ($i=0; $i -lt $data.count; $i++) {
	#process the multiline record to get user UPN account name and certificate expirations
	if ($recordbound) {
		$result = new-object PSobject
		$UPN = $data[$i].substring($data[$i].indexof('"')+1).trim('"')
		$dateval = $data[$i+1].substring($data[$i+1].indexof(":")+1)
		$dateval = [datetime]$dateval
		add-member -input $result NoteProperty UPN $upn
		add-member -input $result NoteProperty Expiration $dateval
		$i = $i+2
		$recordbound = $false
		$results += $result
	}

	#start of a new multiline record
	if ($data[$i] -match "^Row ") {
		$recordbound = $true
	}
}

#User may have renewed before, so there can be more than one cert...so group by user UPN
$groupdata = $results|group UPN
$curdate = get-date

#Look at all certificates for a given user and select the one with the furthest expiration date (I.e. last one issued to this UPN)
$groupdata = $groupdata | Select Name,@{name="expiration";expression={($_.group|sort expiration |select -last 1).expiration}}

foreach ($entry in $groupdata) {
	$debugstr = "$($entry.name)  Expiration $($entry.expiration)"
	$timediff = new-timespan -start $entry.expiration -end $curdate
	$days = 0 - $timediff.days
	if ($days -lt 30) {
		$debugstr += ".  In expiration window."
		#expiration warning, need to find primary account email and send it, if they are still active
		$user = get-aduser -ldapfilter "(&(objectclass=user)(userprincipalname=$($entry.name)))" -properties enabled,manager
		if ($user.enabled) {
			$debugstr += "  Account is enabled."
			#do something with it
		} else {
			$debugstr += " User 431 is disabled, ignoring."
		}
	}
	write-debug $debugstr
}

Tuesday, September 28, 2021

Task scheduler repeat popup "task scheduler service is not available. Verify the service is running."

Recently I noticed a few different errors on task scheduler on some machines that had gone through in place operating system upgrades from Windows 2008 to Windows 2016. After the upgrade, when opening the task scheduler gui tool, it either gave popup messages repeatedly saying the service was not available despite the service being started. Clicking through many of these, it would eventually show some tasks in the list, but not all. Also schtasks.exe was working fine and showing all the tasks. On some of the machines, the gui tool was just giving snap-in errors and nothing would load in the tool. 


The issue turned out to be from some of the legacy jobs. In older versions of windows, simple scheduled tasks could be created through the at.exe command. If some jobs existed on the machine prior to the upgrade, they would still be in the windows directory, and will still show up in schtasks.exe. You can't edit or delete them with the schtasks command line tool, and they won't show up at all in the GUI after you click through the errors. If you try to use at.exe command it says its no longer supported and won't run. You can just delete the job files from the c:\windows\tasks folder. After that, the errors in the gui tool will go away.

Capturing unique simple bind or unsigned ldap queries from a domain controller

Using get-winevent in powershell with XML filter, you can grab the 2889 events from the directory services log. These contain the username, and source IP. With some custom defined attributes within select-object along with an array, you can filter this down to unique connections.

$query = @"

<QueryList>

  <Query Id="0" Path="Directory Service">

    <Select Path="Directory Service">*[System[(EventID=2889)]]</Select>

  </Query>

</QueryList>

"@


$somelistofdomaincontrollers | %{

$serv = $_

$hashes = @();

get-winevent -filterxml $query | select @{n="dc";e={$_.machinename}},
@{n="source";e={($_.properties.value[0].split(":"))[0]}},
@{n="user";e={$_.properties.value[1]}},
@{n='connhash';e={$str = ($_.machinename + 
    $_.properties.value[0].split(":"))[0] +
    $_.properties.value[1]; $str.gethashcode()}} | %{

     if ($hashes.contains($_.connhash)) {} else {$hashes += $_.connhash; $_|
        select dc,source,user}

}

Thursday, August 5, 2021

Quick way to find all OU's in a domain that block gpo inheritence

Using bitwise and on the gpotions attribute of organizational Unit objects. This will run in seconds compared to attempting to use higher level functions like get-adorganizationalunit in combination with get-gpinheritance.

get-adobject -ldapfilter "(&(objectclass=organizationalunit)(gpoptions:1.2.840.113556.1.4.803:=1))"

Friday, November 6, 2020

AWS script launch ec2 instance in various regions for short term command execution

 I'm in the process of doing some service provider evaluation that requires some network tests to be run from various locations around the world.  Using vpn's might provide a way to do this, but I've been playing around with AWS lately, so I thought I would give EC2 scripting a try.  The code below was created for Powershell with AWS modules on a Linux machine.  The basic concept is go create a single small Amazon Linux 2 image machine in a specified region, connect to it via SSH and run whatever commands you want.  Using the linux ssh client, you can provide a command to run on the remote machine, or multiple commands separated with semicolons.  The client connects, output is on your local terminal, and the connection ends after the commands run.

This script isn't designed for much error handling, but it does look for a local keypair file if you already have one that you want to use.  In this scenario, you will need to provide the file name of the .pem file and the name of the keypair (the AWS EC2 name of it).  If you don't provide one, the script creates a new one for you.  It doesn't clean up the keypair or the security group that it creates, but it will terminate the new EC2 instance at the end of the function call.  Since the code is wrapped in a function, you can run a through a list of regions or a list of regions + keypair info to execute commands across several regions.


Note: Some lines of code have been split for clarity and may require them to be recombined for them to execute. You will need to have an AWS profile and credentials set up on your machine already.


function run-test {
    param(
        [string][parameter(mandatory=$true)]$region,
        [string][parameter(mandatory=$true)]$command,
        $keypairFileName, $kpname)

    if ([string]::isnullorempty($keypairfilename) -or 
    	(-not (test-path $keypairfilename))) {
        #no keypair file provided or found, create a temp one

        $kp = new-ec2keypair -keyname $($region + "-tempkp") -region $region
        $keypairFileName = $region + "-tempkp.pem" 
        $kpname = $region + "-tempkp"
        $kp.KeyMaterial | Out-File -Encoding ascii $keypairfilename
        chmod 600 $keypairfilename  #for linux
    }

    #get most recent Amazon Linux 2 image
    $id = Get-EC2Image -Owner amazon -Region $region |
        where {$_.name -match "amzn2*" -and $_.architecture -eq "x86_64" 
        	-and $_.platformDetails -match "Linux"
          	-and $_.rootdevicetype -eq "ebs" 
        	-and $_.virtualizationType -eq 'hvm'} |
        sort-object creationdate |
        select -last 1 |
        select -expand imageid

    #create a security group for the launch with SSH ingress allowed
    $secgroup = get-ec2securitygroup -region $region | 
    	where {$_.description -eq "SSH-only"} |select -exp groupid
    if ($secgroup -eq $null) {
        New-EC2SecurityGroup -region $region -GroupName "SSH-only" -description "SSH-only"

        $secgroup = get-ec2securitygroup -region $region | 
        	where {$_.description -eq "SSH-only"} |select -exp groupid

        $cidrBlocks = New-Object 'collections.generic.list[string]'
        $cidrBlocks.add("0.0.0.0/0")
        $ipPermissions = New-Object Amazon.EC2.Model.IpPermission
        $ipPermissions.IpProtocol = "tcp"
        $ipPermissions.FromPort = 22
        $ipPermissions.ToPort = 22
        $ipPermissions.IpRanges = $cidrBlocks

        Grant-EC2SecurityGroupIngress -Groupid $secgroup 
        	-IpPermissions $ipPermissions -region $region
    } 

    $instance = New-EC2Instance -Region $region -ImageId $id -Instancetype t3.nano 
    	-KeyName $kpname  -AssociatePublicIp $true -securitygroupid $secgroup 

    $publicname = $null
    while ($publicname -eq $null) {
        sleep 5
        $publicname = (get-ec2instance $instance.Instances.instanceid 
        	-region $region).instances.publicdnsname
    }
    
    sleep 30
    ssh -i $keypairfilename ec2-user@$publicname $command

    Remove-EC2Instance -Instanceid $instance.Instances.instanceid -force -region $region
}

#sample execution
$command = 'ping -c 10 server1.test.com ; ping -c 10 server2.test.com ; 
sudo yum install traceroute -y; sudo yum install bind-utils -y ; 
sudo traceroute -n server1.test.com; sudo traceroute -n server2.test.com ; 
nslookup -type=TXT test.com ; nslookup -type=SOA test.com; 
nslookup -type=txt test.com 8.8.8.8'

run-test -region ap-southeast-1 -command $command

Wednesday, October 21, 2020

AWS storage gateway quick and easy lab

 I've been doing some studying of the AWS sysop exam areas.  Storage gateway seemed like a very interesting and useful tool that many organizations are quickly place in their environment for file storage provisioning or storage capacity expansion.  I didn't go to in depth on this, however I was able to deploy a storage gateway, a windows AD domain, an NFS share off the gateway, do a domain join of gateway to AD, and then deploy an SMB share all within about 2 hours (first time touching this tech).


My environment for the lab:  

    Host OS - deskop Linux Mint 19.3.

    Virtualization - Vmware workstation 16 player

    Storage gateway - Downloaded vmware device VM from AWS at the setup of storage gateway.  NIC set to bridged

    Windows domain - Vmware win 2019 eval server.  NIC set to bridged


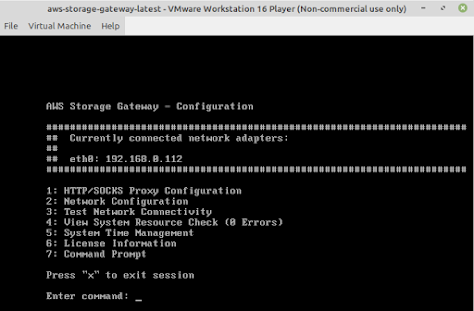
I started with the simple set up of the gateway with an NFS share.  After downloading the AWS SG vm, it boots up to a logon screen, where you can use the default account: admin, password.  In there, you have some limited capabilities through a menu driven interface.  This mostly focuses on network settings, firewall and routing.  For me, it was pretty well configured already for this step.  In the console dialogs you will need to provide the IP of the storage gateway, and your host OS browser needs to be able to connect to it in order to configuration the VM.  With bridged networking, this was no problem at all.  You will need to add an additional storage driver on the VM to act as the caching location.  This will be detected during the configuration in the console.


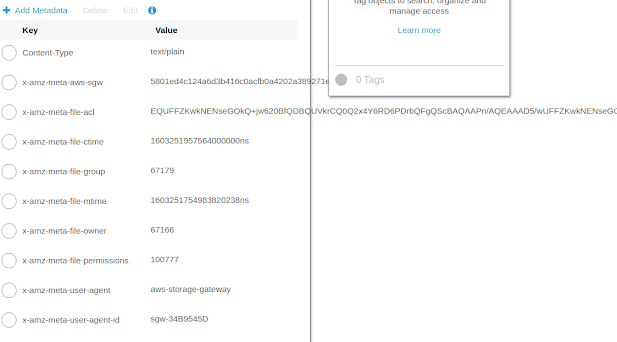
Back in the console, create an S3 bucket for you to use with the gateway.  You can use the same bucket for multiple shares, but it looks like you can use the same prefixed folder for more than one share.  Once you create an NFS share (pretty straightforward for options), you can mount it on your host OS and start putting files in there.  The files will act like normal linux/unix files with owner/group and permissions set.  These replicate up to the S3 bucket and are stored in the object's metadata

testuser@nathan-X299-UD4:/home/nathan/aws-sg$ ls -l
total 2
-rw-r--r-- 1 nobody   nogroup  32 Oct 20 12:12 test1
-rw------- 1 nathan   nathan   17 Oct 20 12:12 test2.txt
-rw-rw-r-- 1 testuser testuser 16 Oct 20 12:17 test3.txt


The files created on the NFS share were very quickly available in S3.  I tried replacing one of them in S3 with new data, and it didn't seem to come down to the share level.  I rechecked the settings on the share and there's a cache refresh option which seems to help with this.  Its got a minimum value of 5 minutes though.  So its best to make changes on the share side of the storage device if you want quick read consistency.

On to the SMB share.  I created the 2019 install and did a dc promo with some basic options.  Server was on bridged network with dhcp.  Local guest NIC had the first dns server set to 127.0.0.1 and a dns forwarder set to external dns provider for internet resolution.  For the gateway, you can join it to AD, but this requires the gateway to be able to connect to the AD domain and resolve the servers.  You don't have too many mandatory parameters, just domain name, user and password.  You connect to AD at the storage gate way config -> actions -> edit smb settings.  For this to work, I had to edit the network settings on the gateway:  Network configuration -> edit dns configuration.  I turned off dhcp and specified my 2019 AD server as the primary dns server IP.  This allowed the gateway to connect to the domain and joined with no problem.  Only took about 1 minute or less.

Once you're joined to the domain, you can create an SMB share using AD authentication and user details.  Files in the share have owners, ACL's, and the usual stuff you would expect on any windows machine.  These replicate up to the S3 bucket in the object's metadata similar to the way NFS works, but the data isn't easy to read.  ACL is encoded, and owner doesn't match to a SID, so I wouldn't expect you can search metadata to try to get much usable information out from the S3 side.

Overall, I would say its an impressive offering and it was quite easy to work with.  Some of the errors I ran into didn't have much documentation though, but I managed to get past them.  What I tried, and failed with on the SMB share: 1) creating the share to access the same prefix and bucket as my NFS share, this doesn't work; 2) creating the share with the default share name, which was a duplicate of the NFS share.  After renaming that, it wasn't an issue.  Other than that, I just had some domain join issues while my AD vm was using NAT nic config and the DNS setting on the storage gateway wasn't right.  All pretty easily resolved.


Documentation ref: https://docs.amazonaws.cn/en_us/storagegateway/latest/userguide/storagegateway-ug.pdf

Convert p7b file to CER/PEM/CRT with microsoft gui tools

 Doubleclick the p7b file to open it, expand all the folders.  In the list of certificates, you might see multiple certificates, as p7b files can be a collection of certificates, which often include the full chain of certificates up to the root.  When converting to a CER, PEM, or CRT file, we are making a file with one certificate in it, so you need to select the specific cert you want to create a file for.  In this example, I'm using fiddler's certificate


Double click the cert you want


Click the install certificate button and use the user store.  Change the option to place certificate in a specific folder and select personal from the popup window


Once the certificate is installed, click start->run-> certmgr.msc


Expand the personal->certificates folder.  Right click on the certificate that you just imported, select all tasks -> export

Use the do not export the private key option


Select the DER or Base-64 option.  This will depend on what system you are using and what it supports.  Base-64 is probably the safest option.

Select an export folder and filename for the converted certificate file.  


Wednesday, March 4, 2020

End to end network latency

When it comes to testing connectivity and latency, I've noticed that many IT technicians don't seem to have any tools in their skill set that go beyond a ping. While that works in many situations, there are often situations where ICMP traffic (including ping) is blocked. At this point, connectivity testing skill set often falls down to a telnet command to the port to see if its open, instead of using many already available tools like the powershell test-netconnection cmdlet. Unfortunately, that commandlet and telnet only show that you can connect to a port, and it doesn't tell you how long it takes to get to it. If you're on a windows machine, you can use the Test-PortLatency function that I've written below. This will give a rough idea of the time to connect in milliseconds to a remote tcp port. If you're on a linux machine, the nmap suite of tools has several programs that give latency information, like nping, or just nmap itself. There are other options as well, and typically some programming languages like python or perl available, which should have some capability to create a simple script to provide this information.

While these tools provide latency from one source point to another, you may find that you need to run tests from multiple points. Connections can get complicated with multiple layers and applications that give you a full end to end experience through multiple servers and protocols. In these cases, you will need to work through to determine what your various points in the connection are, and at what points you need to test from. For example, you may be doing remote desktop through a jump server (bastion host). Your workstation doesn't have direct access to the final remote desktop server. Testing connectivity from the jump server to the final destination only gives you part of the total round trip end to end connectivity. You will need to test from the workstation to the jump server, and then add the latency of the jump server to the final destination to get a rough idea of your end to end latency. If you can run ping's at the different layers, it will help give an idea of packet loss as well.

function Test-PortLatency {

              param ( [parameter(mandatory=$true)][string]$Computer,
                              [parameter(mandatory=$true)][int]$Port,
                              [parameter(helpmessage="Timeout in milliseconds")]$timeout=10000
               )

               $starttime = get-date
               $Testconn = New-Object Net.Sockets.TcpClient
               $Testconn.BeginConnect( $computer, $Port, $Null, $Null ) | Out-Null
               $MaxTimeout = ( Get-Date ).AddMilliseconds( $timeout)
               $millisec = 0

               While ( -not $Testconn.Connected -and ( Get-Date ) -lt $maxTimeout )

                   {
                              Sleep -Milliseconds 10
                              $ms += 10          
               }

               $endtime = get-date
               $result = new-object psobject
               add-member -input $result NoteProperty Connected $($testconn.connected)
               add-member -input $result NoteProperty Milliseconds $(($endtime - $starttime).totalmilliseconds)

               if ($testconn.client.remoteendpoint -eq $null) {
                              $resultstr = "Connection_Refused"

               } elseif ($result.milliseconds -gt $timeout) {
                              $resultstr = "Connection_TimedOut"
               } elseif ($result.connected) {
                              $resultstr = "Successful_connection"
               } else {
                              $resultstr = "status_unknown"
               }

               add-member -input $result NoteProperty Result $resultstr
               $Testconn.Close()
               $result

}

Monday, November 4, 2019

FIM CM / MIM CM Certificate Management service account certificate renewals

references:


Internally FIM/MIM Certificate management has 5 service accounts.  3 of these accounts have certificates stored within their personal certificate store on your application server.  Each certificate uses a unique template that was created during the installation of the application.  As with all certificates, they do eventual expired (based on the settings in your template).

The 3 accounts that have certificates are the Key Recovery Agent, the Enroll Agent, and the CLM agent accounts.  If you are unsure of what accounts are which, go to this folder \Program Files\Microsoft Forefront Identity Manager\2010\Certificate Management\web on your CM server and open the web.config file.  Look for the section that is labelled "CLM users" and find the entries with CLM.RecoveryAgent.Username, Clm.EnrollAgent.Username, and CLM.Agent.Username.  Keep this file open as we need to make changes to it later.

Once you have the accounts identified, ensure you have the correct password for the account.  You can test them using ldp.exe.  If you don't have the password, first go through the password reset process.

With each of the accounts, you will need to open MMC doing a runas.  Open one for each of the three accounts.  Add the certificates snapin with the Current User option.  Expand this, expand personal, and click on certificates.  Unless you have gone through several certificates already, there should only be one in there.

Identify the key that you want to replace, and do an export of each one.  Select PCKS#12 format with "include all certificates in the certificate path if possible" and "export all extended properties" options.  Set a password and export to a file.  This will give you a backup of the key just in case you need it again.

If you read the second article linked above, you will see that the CLMAgent key needs to be renewed with the same key, otherwise it will break previously issued smartcards.  So you can do a renewal of the existing certificate by right clicking the certificate -> all tasks -> advanced operations -> renew this certificate with the same key.  Click next/enroll/finish.  You can do this for each of the 3 certificates.  Once you have the new certificate (you will see an updated expiration date), open the certificates, go to the details tab, find the thumbprint value and make a copy of each new certificate's thumbprint.  

Note: when copying the thumbprint value, you will end up with some invisible unicode character at the beginning of the string.  Paste the thumbprint to notepad, go to the start of the string and hit Del once.  This should get rid of it.  Remove all spaces between the hex values.  To validate that the special char has been removed, copy and paste the whole string into a command prompt and look for any box shaped character.  If there are none, then the string is properly cleaned up.

Once you have all certificates renewed, and your thumbprints gathered, go to the web.config file for the CM application.

Look for Clm.SigningCertificate.Hash.  Replace the current value with the new thumbnail of the ClmAgent certificate

Look for Clm.ValidSigningCertificate.Hashes.  Add the new thumbnail of the ClmAgent certificate to this as a comma seperated list.

Look for Clm.SmartCard.ExchangeCertificate.Hash.  Replace this with the ClmAgent certificate hash.

Search for Clm.EnrollAgent.Certificate.Hash.  Replace this with the EnrollAgent certificate hash.

Go to your certificate authority server.  Open the certificate authority utility, rightclick the CA name, open properties.  Look for the policy module tab, click properties.  Go to the signature certificates tab.  Add a new hash and enter the ClmAgent thumbnail here.  Restart certificate services.

On your CM server, run IISRESET.

If you use recovery agent's, follow the additional steps mentioned in the first link above.

Service Account password resets for FIM CM / MIM CM service accounts

Microsoft's identity manager - Certificate management product has several different service accounts associated with its internal functions as well as an IIS application pool account.  For best practices, it is always good to periodically change service account passwords.  For this product, the account passwords are not configured on windows services, or other easily identifiable locations, so automated password management tools won't be very helpful.

To start with, you want to identify all of your service accounts what roles they perform.  If you are unsure, logon to your CM server and open up the:  \Program Files\Microsoft Forefront Identity Manager\2010\Certificate Management\web folder.  Open the web.config file and look for the section labelled "CLM USERS".  Under this you will find keys for usernames for each component.

Open up a command prompt and go to the CM folder path, and BIN subfolder.  In this folder, there is a tool called clmutil, which will be used to enter the new account passwords.  The account name values in this tool don't perfectly line up with what is in the webconfig.  They are

WebConfig      ->    clmutil
AuthzAgent            authAgent
Agent                      agent
CAManager            caMngr
RecoveryAgent       krAgent
EnrollAgent            enrollagent

Start by going to Active Directory and creating a new strong password for each account.  Make note of the passwords for each username, and ensure you match up your usernames to the roles above.

For each of the accounts, run the clmutil, ex:

clmutil -setacctpwd authAgent  "mynewPassword"

Once you have entered the new account passwords matching each of the service account's roles, open up IIS administration.  Look in the application pools for clmAppPool.  Check the identity of the pool.  For the service account associated with that, do a password reset in Active Directory.  Open the advanced settings for the application pool, click the ... button on the identity value.  Click the set button.  Enter the username and the new password, then click ok, ok, ok.

Now that you have reset all of the passwords, run an iisreset on the server.  Ensure everything is working after that.  If you have additional FIM/MIM CM server nodes, you will need to enter the passwords on each one.

How to pull a full list of users to certificates and card mappings from FIM CM / MIM CM

If you want to collect a report that combines usernames to certificate serial numbers, linked to the card serial number, along with the date the card was issued, you can use this query on your FIM CM database:

Select
u.unc_user_nt4_name, c.cert_issued_serial_number, s.sc_serial_number,
s.sc_manufacturer_id, q.req_submitted_dt,
replace(replace(replace(replace(replace(s.sc_status,'1','Assigned'), '2', 'Active'), '3', 'Disabled'), '4', 'Suspended'), '5', 'Retired') as Status

from dbo.Certificates as C left join dbo.ProfileCertificates  as p
on c.cert_id = p.pc_cert_id 

right outer join dbo.Profiles as r
on p.pc_profile_uuid = r.profile_uuid

 inner join dbo.UserNameCache as u on r.pr_assigned_user_uuid = u.unc_user_uuid

right outer join dbo.Smartcards as s on
r.pr_sc_uuid = s.sc_uuid

right outer join (select * from dbo.Requests where req_type=1) as q
on q.req_sc_uuid = s.sc_uuid

order by unc_user_nt4_name,sc_serial_number,req_submitted_dt

Thursday, September 26, 2019

FIM or MIM certificate manager client tracing (Cmclient)

I have found that most of the posts you can find regarding setting up trace logging on the CM Client side don't really work.  These are the steps that MS provided to me in a recent case.

1) Open regedit
   a) create key:  [HKEY_LOCAL_MACHINE\SOFTWARE\Wow6432Node\Microsoft\CLM\adk]
   b) create key: [HKEY_LOCAL_MACHINE\SOFTWARE\Wow6432Node\Microsoft\CLM\adk\TraceError]
      i)  Create Reg_DWORD with name "*", and value 0x1
      ii)  create REG_DWORD with name "C:\Program Files (x86)\Internet Explorer\IEXPLORE.EXE", with value 0x1
     iii) create REG_DWORD with name "c:\Program Files (x86)\Microsoft Forefront Identity Manager\2010\CM Client\bin\clmProfileUpdate.exe", with value 0x1

   b) create key [HKEY_LOCAL_MACHINE\SOFTWARE\Wow6432Node\Microsoft\CLM\adk\TraceError\Folder]
    i) create REG_SZ with name "C:\Program Files (x86)\Internet Explorer\iexplore.exe" with value "C:\cmtraces"   (or wherever you want the log file to be created)
    ii)  create REG_SZ with name "C:\Program Files (x86)\Microsoft Forefront Identity Manager\2010\CM Client\bin\clmProfileUpdate.exe"  with value "C:\cmtraces"

Grant permissions to everyone on that file location that you are logging to.

Search the registry under HKCU for "TraceError".  If that exists under a folder structure that has a CLM key folder above it, delete the whole CLM key.


The above registry keys look like its very x86 specific, so similar keys may be needed for x64 client versions or IE.


FIM/MIM certificate manager, can't enroll due to wrong number of attributes

Certificate manager can be picky about x86 and x64 versions of Internet Explorer and the CM client software.  In the past, I've had cases where the x64 client needed to be installed and x64 IE used.  Other times both needed to be x86.  Recently I hit this "wrong number of arguments" error while issuing a card in a newly built environment.  The issue was resolved by running the x64 bit version of IE with the x86 version of the client installed.  For newer windows OS, the link to IE should default to the x64, but older ones may point to x86.  In the two "program files" directories, you can get to the correct .exe version if you really want to make sure you have the right one.


Trace:


"2019-07-07 18:48:53.85 -07" "Microsoft.Clm.BusinessLayer.SmartCard.SmartCard" "Void EnrollFailed(Microsoft.Clm.Common.Requests.Request, System.String, Boolean, System.String)" "CONTOSO\CertAdminGuy" "CONTOSO\CertAdminGuy" 0x000004D8 0x00000004

Enroll sequence failed. Smart Card UUID: c1e07453-4610-46cf-b9f2-4e0b819eda80 OnIntall: False Error: Wrong number of arguments or invalid property assignment

"2019-07-07 18:48:53.95 -07" "Microsoft.Clm.Web.Modules.BaseCspUserControl" "Void ProcessClientMessage(Microsoft.Clm.BusinessLayer.SmartCard.BaseCsp.Serialization.bcspClientMsg)" "CONTOSO\CertAdminGuy" "CONTOSO\CertAdminGuy" 0x000004D8 0x00000004


1) Exception Information

*********************************************
Exception Type: Microsoft.Clm.BusinessLayer.SmartCard.BaseCsp.ClientException
Number: -2146827838
Message: Wrong number of arguments or invalid property assignment
Data: System.Collections.ListDictionaryInternal
TargetSite: Microsoft.Clm.BusinessLayer.SmartCard.BaseCsp.ServerMessage Fail()
HelpLink: NULL
Source: Microsoft.Clm.BusinessLayer


StackTrace Information

*********************************************
   at Microsoft.Clm.BusinessLayer.SmartCard.BaseCsp.EnrollProtocol.Fail()
   at Microsoft.Clm.BusinessLayer.SmartCard.BaseCsp.Protocol.HandleError()
   at Microsoft.Clm.BusinessLayer.SmartCard.BaseCsp.Protocol.ProcessClientMessage()
   at Microsoft.Clm.BusinessLayer.SmartCard.BaseCsp.Protocol.ProcessClientMessage(Guid requestUuid, bcspClientMsg clientMsg)
   at Microsoft.Clm.Web.Modules.BaseCspUserControl.ProcessClientMessage(bcspClientMsg msg)